Documentation

Set up your workspace

Start by reviewing the dashboard, checking your business details, and confirming the account settings that drive the booking experience.

Dashboard overview

For busy service professionals, this screen answers the most important daily questions quickly: What needs attention now? Are bookings moving forward? Is revenue growing? Is the system healthy enough to trust?

  • Last updated: August 26, 2026
  • Reading time: 2 minutes
  • Difficulty: Beginner
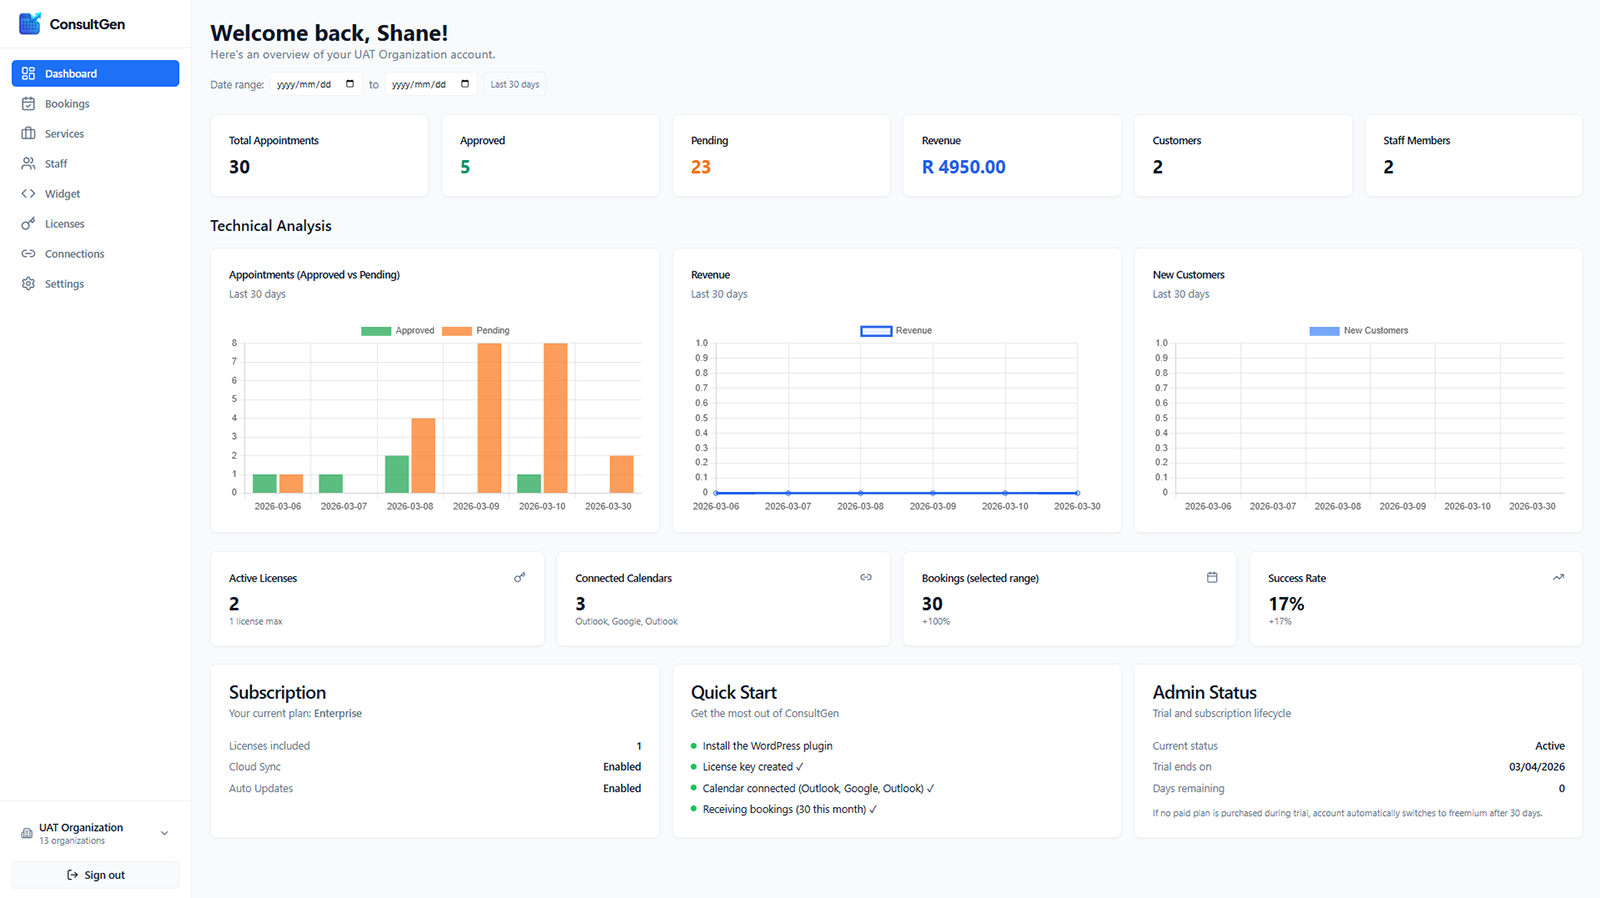
ConsultGen dashboard overview

Why this matters: Your ConsultGen dashboard is the control center for your appointment scheduling software. It gives you a live view of the booking lifecycle, so you can spot pending work, track revenue, measure customer growth, and confirm that your automated booking system is connected properly.

For busy service professionals, this screen answers the most important daily questions quickly: What needs attention now? Are bookings moving forward? Is revenue growing? Is the system healthy enough to trust?

How to review your dashboard in 6 steps

  1. Confirm the organization and date range. Check the organization name in the sidebar, then set the date filter to a useful period such as the last 30 days or a custom week.

  2. Scan the KPI cards. Review Total Appointments, Confirmed, Pending, Revenue, Customers, and Staff Members.

  3. Act on pending bookings. If pending appointments are high, open Bookings and review EFT requests or unfinished payments.

    Confirm once payment clears, or Cancel abandoned unpaid requests.

  4. Review the charts for trends. Compare confirmed versus pending appointments, revenue trends, and new-customer growth over time.

  5. Verify system health. Check Active Licenses, Connected Calendars, Bookings in range, and Success Rate.

  6. Plan the next action. Use the Subscription, Quick Start, and Admin Status cards to decide whether you should finish setup, update billing, add staff, or upgrade your plan.

Key metrics

  • Confirmed — bookings that are confirmed or already completed. Free bookings and successful card/gateway payments confirm automatically; EFT appears here after you click Confirm.
  • Pending — not confirmed yet. Usually EFT waiting for you, or a card booking that has not finished paying. Not a separate approval queue for every booking.
  • Revenue — booking amounts in the selected range. Check your payment gateway for settled cash.

Confirmed vs Pending chart

Green bars are confirmed (or completed) appointments. Orange bars are pending. Tall orange bars usually mean EFT is waiting on Confirm or checkouts were abandoned.

Common questions

Can I auto-confirm everything? Free bookings and successful card/gateway payments (on trial/paid plans) already confirm automatically. EFT always needs a manual Confirm. There is no Auto-Approval Rules screen.

Why don't my numbers match my bank account? Dashboard Revenue reflects booking amounts in ConsultGen, not necessarily settled cash.
Company profile

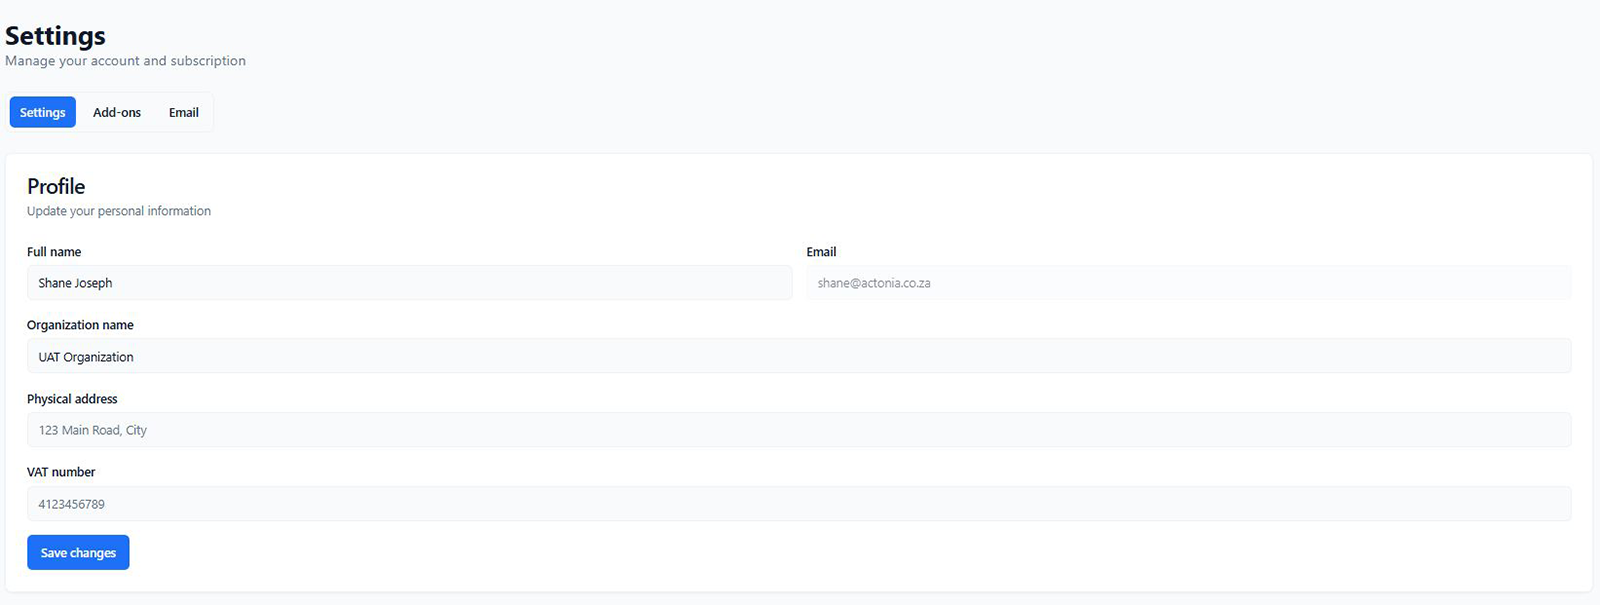
This guide walks you through the main Settings page, where you'll manage your personal profile, organization details, and subscription information.

  • Last updated: March 30, 2026
  • Reading time: 3 minutes
  • Difficulty: Beginner
ConsultGen company profile settings

Why This Matters

Your Settings page is the foundation of your professional identity within our appointment scheduling software. Think of it as the business license on your wall—it tells clients who you are, where you're located, and that you're a trusted professional.

Keeping this information accurate ensures a smooth booking lifecycle for your clients. Correct details mean:

  • Email notifications go to the right place.
  • Invoices are generated with the correct business name and address.
  • Clients feel confident they are booking with the right person.

As your 24/7 digital receptionist, ConsultGen uses these details to represent your brand perfectly with every interaction.


Navigating Your Settings

At the top of the page, you'll find three tabs to help you manage different parts of your account.

  • Settings: This is where you are now. It holds your core profile and business information.
  • Add-ons: Visit this tab to explore and manage optional features that can enhance your booking system, like payment gateway integrations or advanced calendar connections.
  • Email: Use this section to customize the email notifications that are automatically sent to you and your clients.

Your Profile: Update Your Personal Information

This section contains the key details about you and your business.

  • Full name
    • This is your personal name. It helps your team members identify you within the system and can be used to personalize communications.
  • Email
    • This is the email address you use to log in. It's also the primary address where ConsultGen will send you important notifications about your account and new bookings.
  • Organization name
    • This is your business name as your clients see it. It will appear on your booking widget, notifications, and invoices to ensure a professional and consistent brand experience.
  • Physical address
    • Your business's physical location. This is essential for accurate invoicing and for clients who need to know where to find you.
  • VAT number
    • If your business is registered for Value-Added Tax (VAT), enter your number here. This ensures your invoices are compliant with local tax regulations.

Saving Your Changes

After making any updates to your profile, simply click the Save changes button. Your information will be updated instantly across the ConsultGen platform, ensuring your digital receptionist always has the most current details for your business.

Bank details

Review payout and finance information before accepting live bookings and payments.

  • Last updated: March 30, 2026
  • Reading time: 2 minutes
  • Difficulty: Beginner
ConsultGen bank details settings

Why this matters for your business: Getting paid is the most important part of your day. Setting up your bank details securely ensures that the revenue you generate from your appointments goes straight into your business account without delays. We keep this page simple so you always know exactly where your funds are heading.

1. Check Your Subscription Plan

At the top of your Bank Transfer Details screen, you will see your Current plan (for example, the "Professional Plan"). Your plan type dictates certain features, like payout limits or processing times. If your business is growing and you need to adjust your limits, simply click the View plans link to upgrade.

2. Verify Your Bank Account Details

Before requesting a payout, always double-check the bank information on file to prevent transfer delays. You will see three fields:

  • Bank name: The financial institution receiving your funds.
  • Account number: Your unique business account number.
  • Branch code: The specific routing or branch code required for your local transfers.

Note: If any of this information looks incorrect, contact Support immediately before requesting funds.

3. Request Your Payout

Once your bank details are verified and you have funds available from your completed bookings, it is time to get paid. Click the primary Request payout button at the bottom of the screen. This will initiate the transfer of your available balance directly to the bank account listed above. Depending on your bank, funds typically arrive within 1-3 business days.

Back to Core Features